


;)

Proper chimney flashing should be applied so that the unlike materials of Masonry, Wood, Shingles and Flashing can move together, expand and contract as necessary so as not to damage the seal. How this is achieved is the flashing should be "stepped and overlapped" at each shingle row and embedded into the mortar joints either before the chimney is completed or by cutting in with a diamond bladed hand grinder after the mortar is set. The latter of these mentioned is the method needed when repairing a badly done job or for making corrections.
The amount you overlap each shingle flap should be as you would with any other flashing situation and more if you think windage and adverse weather will push water up the joint. Before every chimney job it is probably best to use a decent ice shielding product as an underlayment over the sheathing underneath the roofing as a collar for extra assurance.
Tidiness and adherence to simple overlay techniques will assure a good seal where smudging tar all over the place should be un-necessary. Behind the chimney many used to tar below and over the lead but the better way is to use a "Crick" or a small gabled roof section and to continue the step flashing all around to insure good water and ice flow away from piling up behind the chimney.
Here is an artist rendition of the technique of chimney flashing as described without the layer of shingles obscuring the look. Of course in reality the lead on the roof sides would naturally be unseen as it would be under each shingle tab yet over the shingles back side. 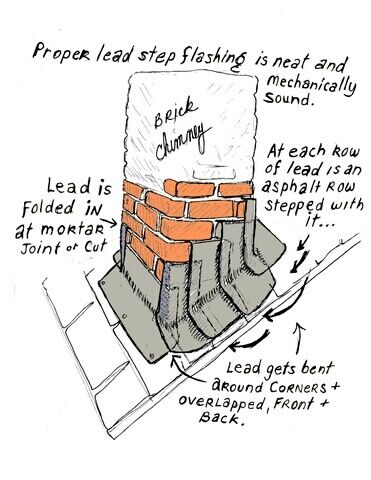
The second image shows what the shingles should look like after flashing is completed.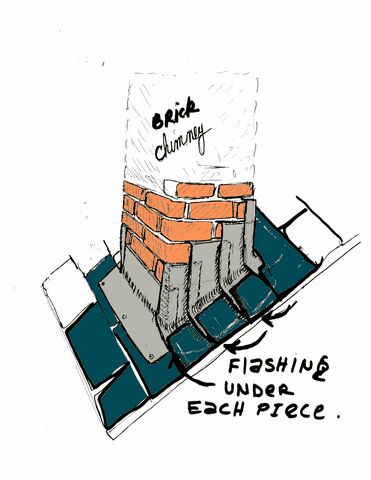
There is a second method of flashing that allows better expansion and movement such as when the house settles over time and that is a technique , that was described to me as "Counter flashing". The advantages of counter flashing is that it allows the roofer to correctly place step flashing perfectly at every roofing tab row without the limitations of how the lead is placed in the rows of brick above. Though it takes more time the results can be better looking and more weather tight.
Counter flashing is when the roof to chimney flashing is of two different applications of assembly. The roofer when roofing the area around the chimney uses conventional step flashing wisdom and collars the chimney as if it is any other part of the house, sending the flashing up the chimney sides without cutting it into the mortar. Then when the masonry steps are taken the lead flashing is cut in or laid in place at each mortar joint and allowed to overlap the other flashing fully down to the seam where the chimney and roof intersect creating a substantial overlap.
Some Craftsmen will run the side lead pieces up like a stair skirt board and cut in each mortar flap as needed to make a one piece side flashing where as others will use a similar method as the one shown above using multiple pieces to step the sides. Either way an effort to allow movement where you want it to occur and tightness from the weather should be done with good mechanical wisdom. The single side piece would be less prone to weather movement and driving rain patterns.
There is a really nice video on Youtube at Justlead.com that can be seen here.
There is also a nice image gallery here at Lassard roofing.
Sealants used instead of mortar at the brick joints is acceptable and sealant underneath at shingle tabs is unnecessary but can help in situations such as seaside communities where rain going up hill from wind isn't uncommon. At no time should the bottom edges, where the water is supposed to drain out and over every preceding layer be blocked up with smudging it with tar or some high tech painted on garbage.
Expansion and contraction of roof to chimney joints are a normal part of understanding nature and how it affects your home construction and realizing what gets affected is the job of a responsible tradesman and craftsman. Obvious the limitations of materials that can only temporarily shrink and stretch and later crack are not what a roofer should be using to finish a job with the pride and responsibility that is needed.
The roof to chimney joint is not a good place for invention or experimentation with ideas not proven to last the life of the house. That is why the tried and true methods laid down from years of experience are best to copy and not to eliminate because of the amount of time it takes to do them right. Money and grief are the two things most saved when following correct applications and proper procedures, and every roofer has been faced with the discovery upon many a roof where some one saved a penny and cost themselves a future of grief with a poor application of bad materials poorly conceived.
Good luck and I hope this helps you out or your next job.
Ron